Single sign-on (SSO)
👤 Who can use this feature
Available on Enterprise plans
Overview
Admins of Enterprise workspaces can force users to authenticate to Dovetail using OpenID Connect SSO.
This page includes instructions to set up SSO in your identity provider including AD FS, Auth0, Azure Active Directory, Google Workspace, and also Okta.
Set up SSO
The process for configuring SSO will depend on your specific identity provider. We've outlined the general process for implementing SSO below.
Create a new application
Set up SSO in your identity provider - You must generate a Client ID, Client secret, and Discovery URL in your chosen provider. On your provider, set the application's
Redirect URIs or Callback URIs to be
https://dovetailapp.com/users/oauth2/callbackandhttps://auth.dovetail.com/login/callback
Enable SSO in Dovetail
Open your Dovetail workspace to add the Client ID, Client secret, and Discovery URL in ⚙️ Settings > Authentication > Authentication options.
Just-in-time provisioning
Dovetail supports just-in-time (JIT) provisioning when domain-restricted sign up is enabled for your SSO domain. When domain-restricted sign-up is enabled, a user that tries to log in when they don't have an account will automatically have a new viewer account created for them.
If your identity provider supports custom JWT claims at a per-user level you can optionally override the default viewer role they are first granted on a per-product basis by providing the key default_dovetail_role with a values of either "MANAGER", "CONTRIBUTOR", OR "VIEWER".
Active Directory Federation Services (AD FS)
Create a new application in Azure
In AD FS Management, right-click on Application Groups and select Add Application Group.
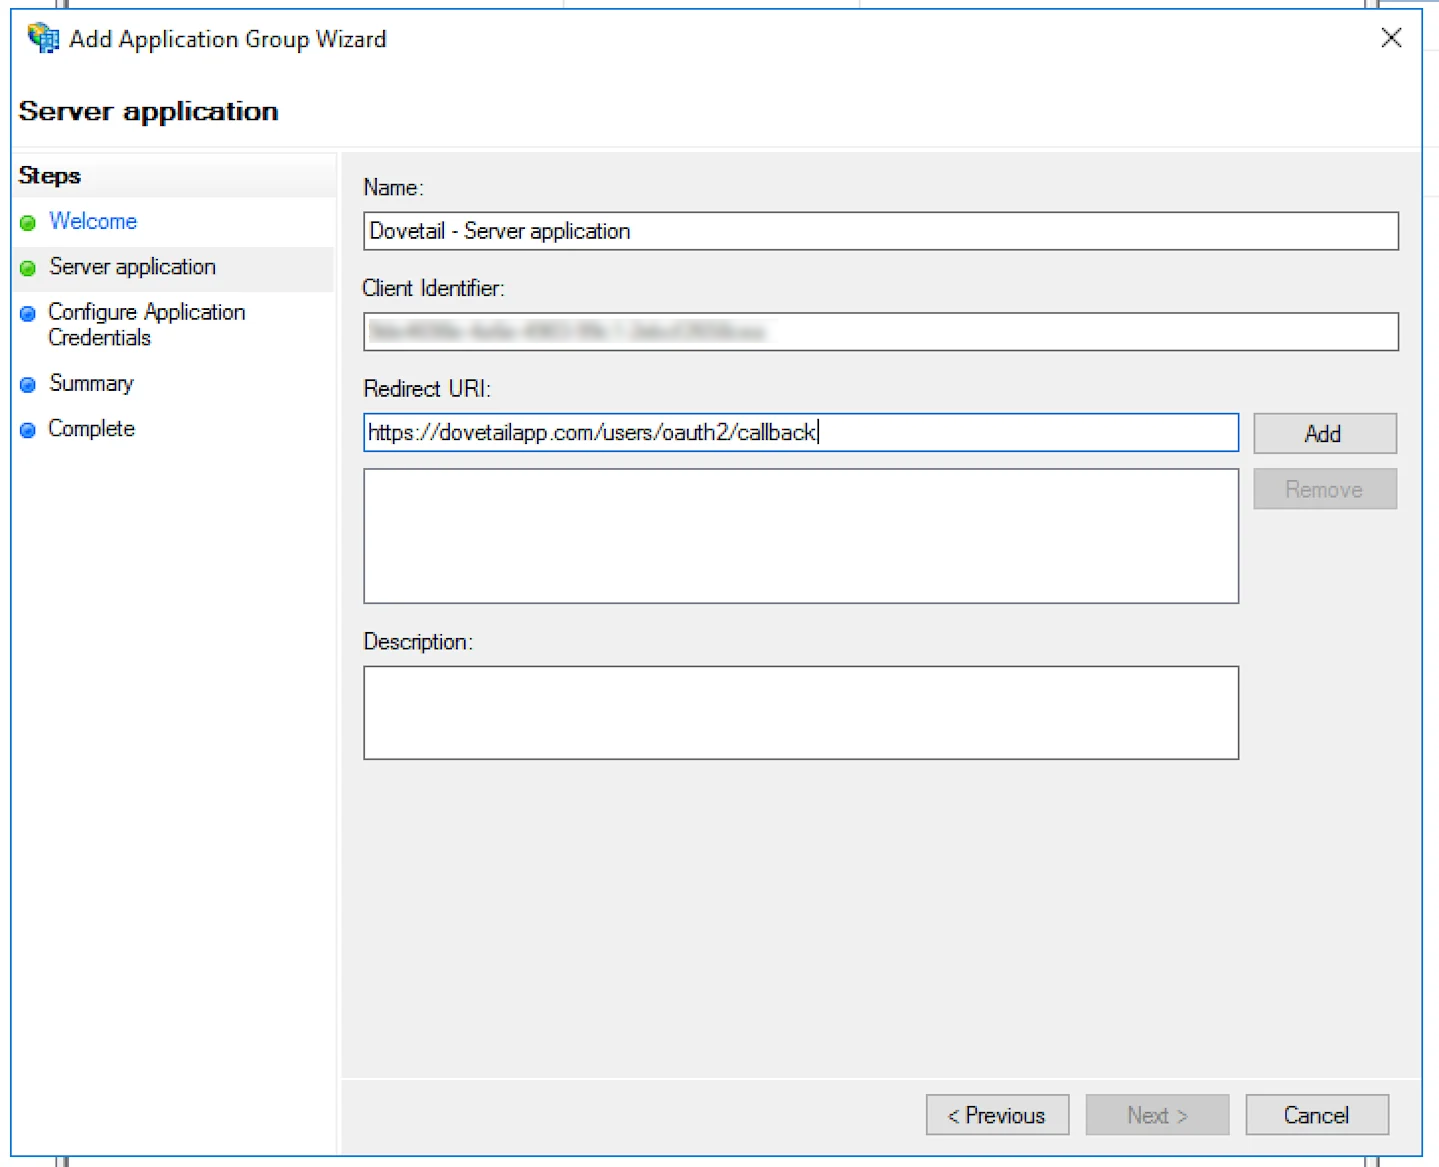
On the Application Group Wizard, for the name enter Dovetail and under Standalone applications select the Server application template. Click Next.
![]()
Copy the Client Identifier value. Keep a note of it as it will be inserted later into Dovetail.
Add the following for Redirect URIs: -
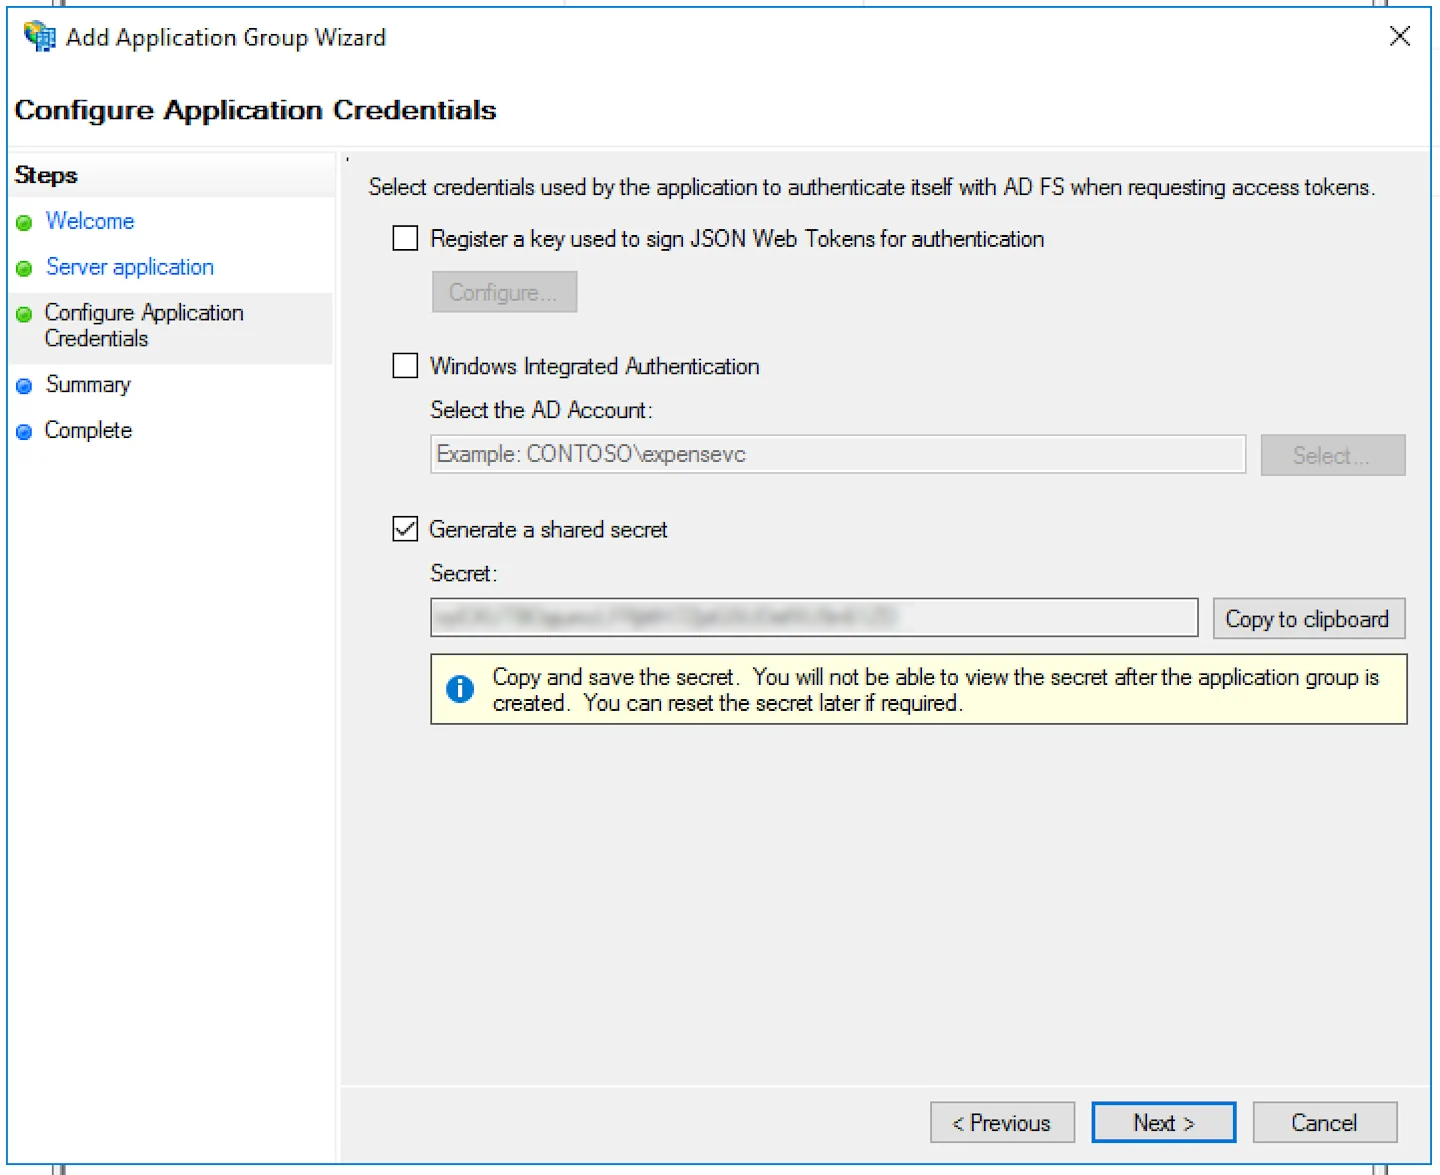
https://dovetailapp.com/users/oauth2/callbackandhttps://auth.dovetail.com/login/callback. Click Add. Click Next.Check the box beside Generate a shared secret, copy the Secret as this will also be used in Dovetail. Click Next twice, then close.
![]()
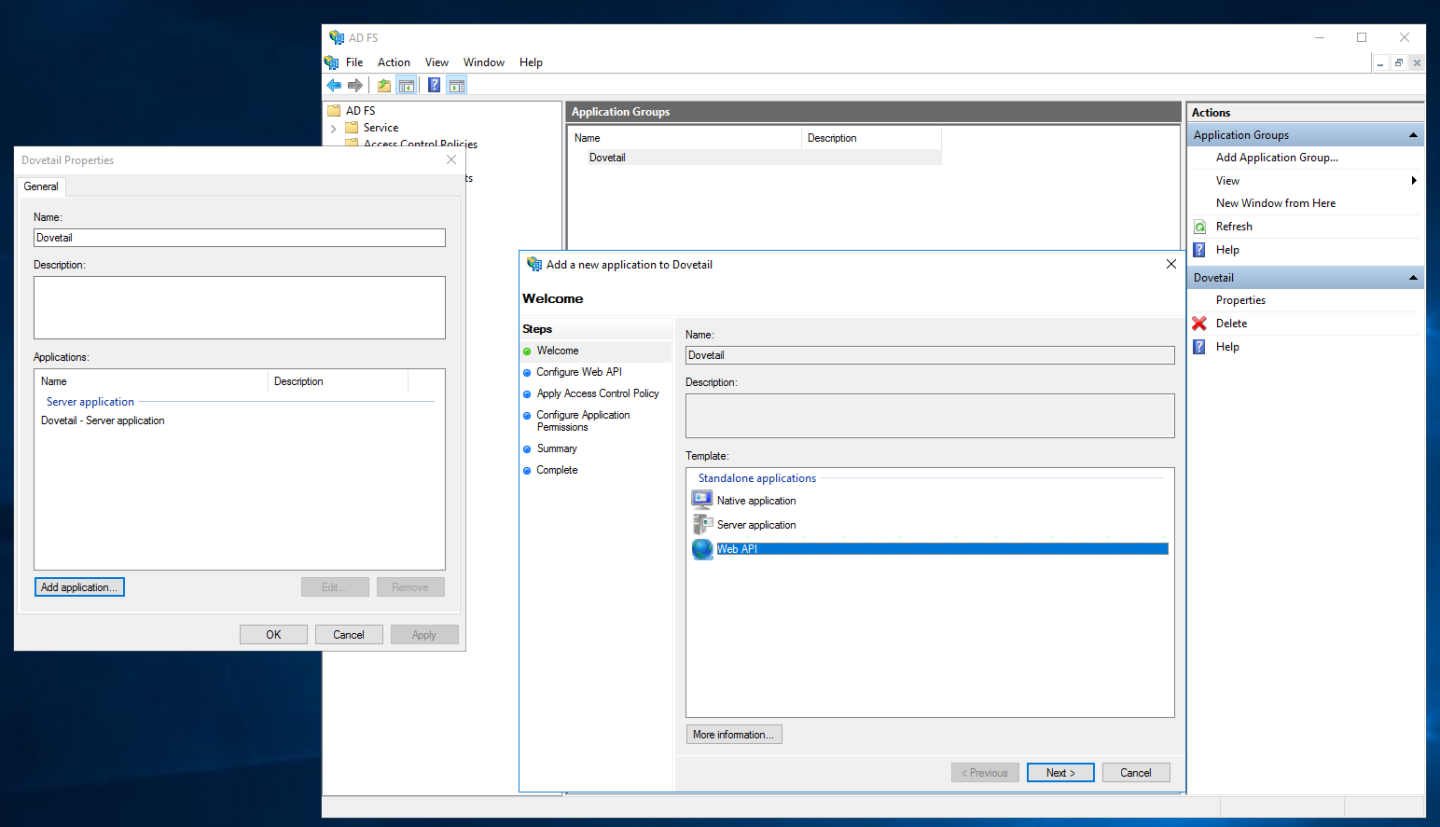
Double-click on your newly created Application Group, click Add application, under Standalone application choose the Web API template. Click Next.
![]()
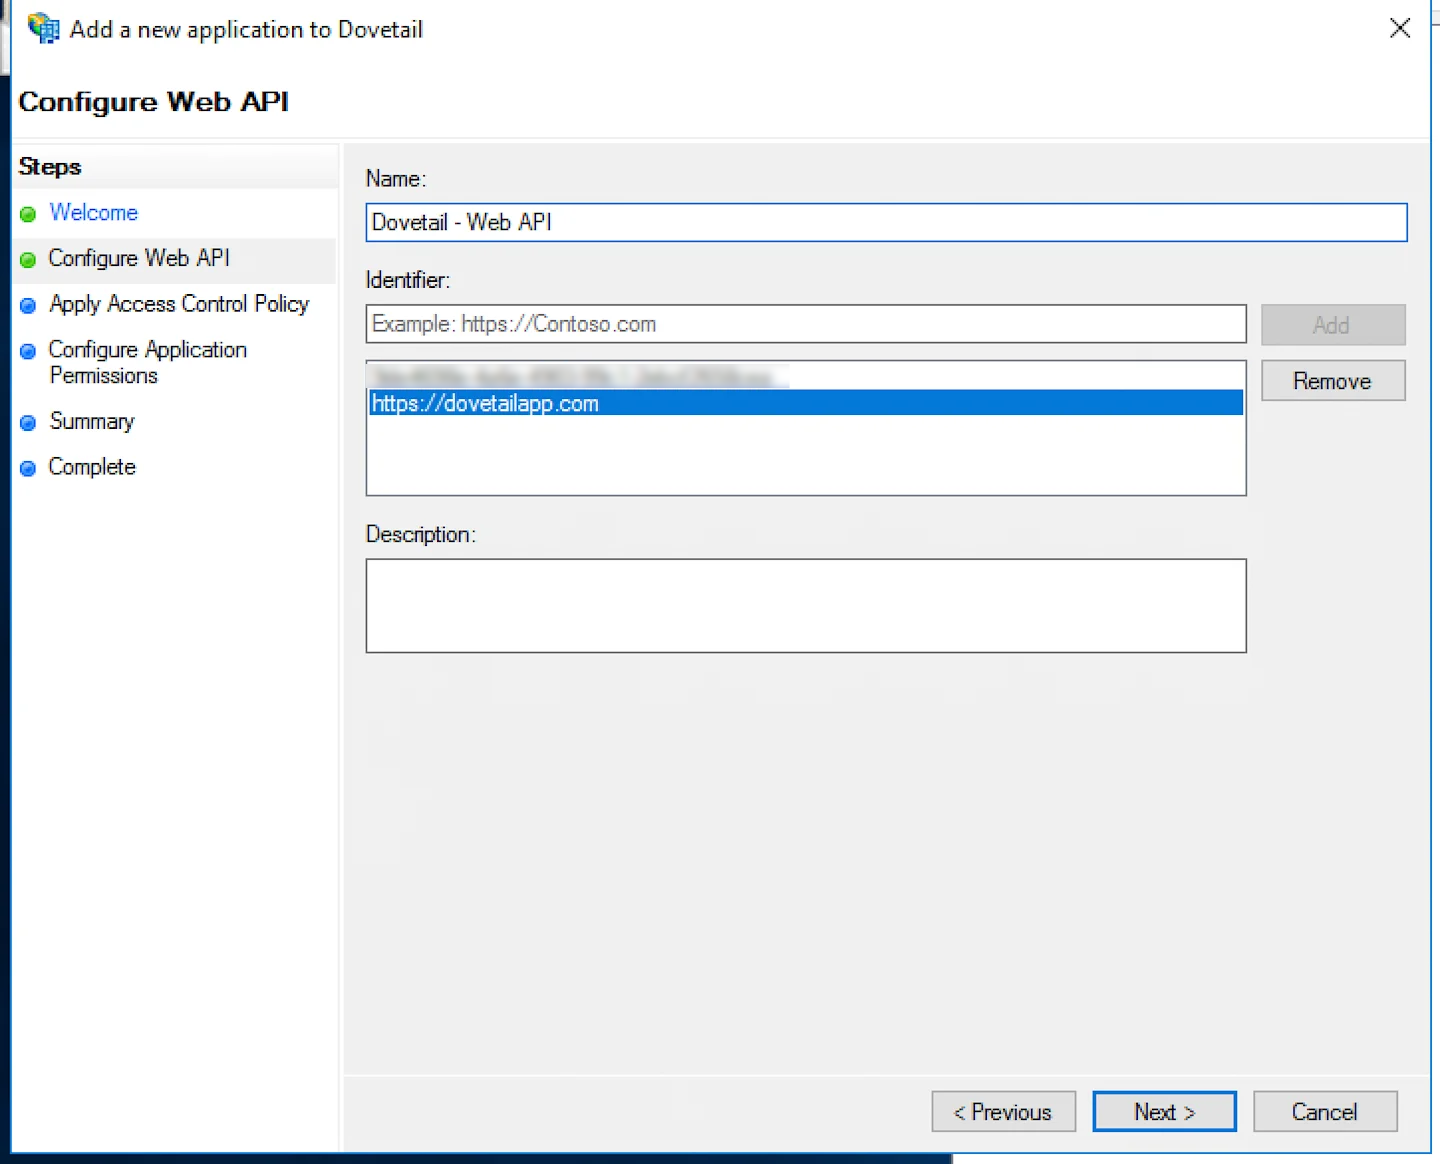
In Identifier add the Client Identifier from step 3, also add the URI
https://dovetailapp.com. Click Next.![]()
For Choose an access control policy, select Permit everyone. Click Next
For Permitted Scopes, select
allattclaimsandopenid. Click Next twice then Close.![]()
Double click on the newly created Web API Application. Click on the Issuance Transform Rules tab. Click Add Rule.
![]()
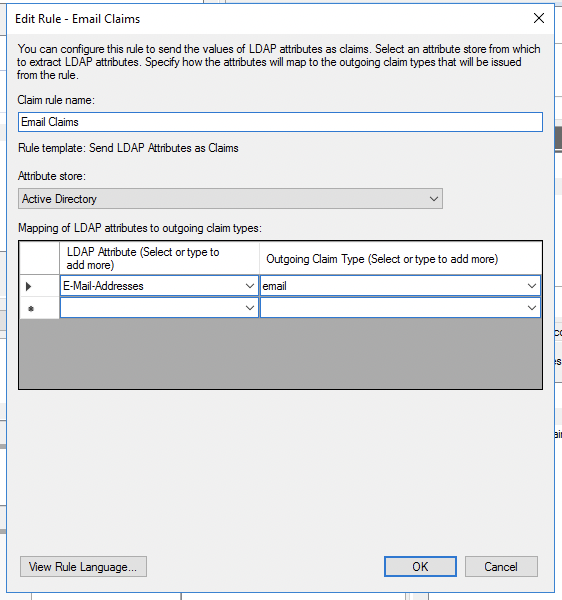
For Claim rule template, choose Send LDAP Attributes as Claims. Click Next.
For Claims rule name: Email claims. Attribute store choose: Active Directory. LDAP Attribute choose: E-Mail-Addresses. Outgoing Claim Type:
email. Click Finish.![]()
Add another rule, this time for Claim rule template choose: Send Claims Using a Custom Rule. Click Next.
For Claim rule name: Skip userinfo. Custom rule
=> issue(Type = "skip_userinfo", Value = "true");Click Finish and restart the AD FS service to ensure all new settings are applied.
Enable SSO in Dovetail
Open your Dovetail workspace to add the Client ID, Client secret, and Discovery URL in ⚙️ Settings > Authentication > Authentication options.
For this, add AD FS application’s Discovery URL (
https://YOUR_ADFS_DOMAIN/adfs/.well-known/openid-configurationwhereYOUR_ADFS_DOMAINis the domain of the AD FS Issuer), Client ID and Client secret values.
Auth0
Create a new application in Auth0
Login to your Auth0 admin dashboard and click Applications.
Select Create Application, enter application name Dovetail, select Application type: Regular Web Applications and click Create.
Navigate to Settings to upload Dovetail logo by pasting the following URL within Application Properties > Application Logo :
https://static-assets.dovetailapp.com/logotype.pngNavigate to Application URIs:
Insert the following URL within the Allowed Callback URLs section
https://dovetailapp.com/users/oauth2/callbackandhttps://auth.dovetail.com/login/callbackUnder Allowed Web Origins, input the following URL
https://dovetailapp.com/
Click Save Changes. The Dovetail application is now successfully set up in Auth0.
Enable SSO in Dovetail
Open your Dovetail workspace to add the Client ID, Client secret, and Discovery URL in ⚙️ Settings > Authentication > Authentication options.
For this, add Auth0’s Discovery URL (
https://YOUR_AUTH0_DOMAIN/.well-known/openid-configurationwhereYOUR_AUTH0_DOMAINis the domain of the Auth0 application’s Issuer), Client ID, and Client secret values.
Microsoft Entra ID (Azure Active Directory)
Enable Microsoft as an authentication method by navigating to Settings > Authentication > Authentication methods.
From a new session in your browser, sign in to your workspace by pressing Continue with Microsoft.
If prompted, select Work or school account from the sign in dialog.
Check Consent on behalf of your organization, and press Accept.
If these steps have been completed successfully, the Dovetail application will be automatically added to your Entra/Azure Directory, and can be found under Enterprise applications.
Please note
You don't need to enable or manually configure SSO through your Dovetail workspace. You only need to have Microsoft enabled as an authentication method.
Google Workspace
Create a new application in Google Workspace
Go to the Google API Console.
From the projects list, Create a new project.
Configure the project’s consent screen:
Click OAuth consent screen in the sidebar.
Select Internal, and click Create.
Enter an Application name, and click Create.
Create credentials
Click Credentials in the sidebar.
Click Create credentials > OAuth client ID.
In Application type select Web application and enter a Name.
In Authorized JavaScript origins, click Add URI and enter
https://dovetailapp.com.In Authorized redirect URIs, click Add URIs and enter
https://dovetailapp.com/users/oauth2/callbackandhttps://auth.dovetail.com/login/callback.Click Create
Copy your Client ID and secret in the dialog that appears. The Dovetail application is now successfully set up in G Suite.
Enable SSO in Dovetail
Open your Dovetail workspace to add the Client ID, Client secret, and Discovery URL in ⚙️ Settings > Authentication > Authentication options.
For this, add Google Workspace’s Discovery URL (
https://accounts.google.com/.well-known/openid-configuration), Client ID, and Client secret values.
Okta
Users can authenticate to Dovetail using Okta SSO. Learn how to generate required values from Okta and how to add these values to Dovetail. Installing the Dovetail Okta integration can be found at Dovetail Okta integration.
Create a new application in Okta
Login to your Okta admin dashboard
Click Applications, select Browse App Catalog, and locate "Dovetail" in the Okta app catalog.
Select the Dovetail app and click Add integration.
Enter your Dovetail subdomain and click Done.
Once the app is installed, click Sign-on and select Edit.
Change Application username format from Okta username to Email and Save.
Navigate to Okta > Assignments tab and assign users and groups to Dovetail.
Enable SSO in Dovetail
Open your Dovetail workspace to add the Client ID, Client secret, and Discovery URL in ⚙️ Settings > Authentication > Authentication options.
For this, add Okta’s Discovery URL (
https://YOUR_OKTA_DOMAIN/.well-known/openid-configurationreplacing YOUR_OKTA_DOMAIN with the domain of the Okta application’s Issuer), Client ID and Client secret values.
For example
If your Okta dashboard URL is dovetail.okta.com, you would enter https://dovetail.okta.com/.well-known/openid-configuration
Supported Features
We support the following with our Okta integration
SP-initiated SSO (Single Sign On)
IdP-initaited SSO (through Third-party Initiated Login)
SCIM
Just-In-Time provisioning
SP-initiated SSO
To use SP-inititaed SSO:
Navigate to https://{subdomain}.dovetail.com/auth/login
Select `Sign in with Okta`
Enter your credentials - if these are correct you'll be redirected to your workspace!
Enabling JIT
To enable Just-In-Time Provisioning, please ensure that Automatic account creation is enabled. You can find that in the Authentication Settings.
Give us feedback
Was this article useful?
Last updated 17 June 2025
Next article
Authentication settings
Streamline and manage authentication in Dovetail.
Last updated: 29 July 2025
